
DVC Guide to STEREOSCOPIC editing
Stereoscopic has become a “hot topic” several times and then tends to sink away again into something that would be a nice idea but most people cannot be bothered about. The general principles remain the same so I have left this article on the website, however, support for editing stereoscopic footage has drifted away.
The latest version of EDIUS, EDIUS 11, dropped support for editing Stereoscopic footage. Premiere never added it as an option, although you could buy an add-on for it. Media Composer and Vegas still support Stereoscopic editing. No “professional” programs developed the ability to make Stereoscopic Blu-rays although you could do this with Power Producer. As I write this short update I have not checked the current situation as no one is asking for it.
For my own 3D projects I save MP4 files which my 3D TV can decode.
What are the major considerations for STEREOSCOPIC filming and editing?
To film a STEREOSCOPIC image you just need to film two pictures which correspond to you left and right eye. This can simply be two cameras on a rig. The problem with a camera rig is getting the cameras the right distance apart, making sure they are exactly the same camera (different lenses and chips can cause really strange results) and making sure the Focus and zoom etc is EXACTLY the same. It is far easier to buy a camera that will film in 3D in the first place.
What STEREO cameras are available?
There are quite a few – in the “reasonable” price range there are a couple from Panasonic and 1 from Sony. How the footage is edited does depend greatly on how it was filmed.
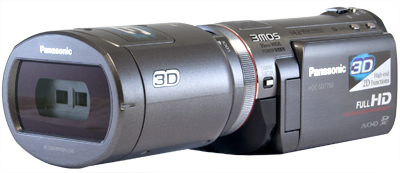 Panasonic HDC-SDT750 camera
The first really cheap 3D camera, the 750 is a variation on the mono Panasonic 700 camera. Pictured here with the 3D lens attached, which can be removed and effectively change the camera into the standard, non-stereo Panasonic 700. This camera does not film full resolution STEREO images but instead films in SIDE-BY-SIDE – the left eye picture is squeezed into one side of the image and the right eye picture squeezed into the other. With the picture being 1920×1080 pixels in total this means you have a STEREO image which is actually 960×1080 – so about half of full HD resolution. This image is very easy to edit and every editing program will let you edit it, and then write it on to a DVD/Blu-ray disc, because it is really just a normal HD picture with the different eye views squeezed into either side. To see this picture on a 3D TV you need to select the SIDE-BY-SIDE mode on the TV.
This camera is approximately £900
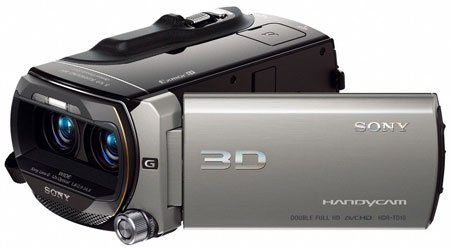 Sony HDR-TD10
This Sony camera films full HD STEREO images. The two images are stored in a single file as separate streams, along with the 5.1 audio. This camera was about £1,000 so making it by far the cheapest camera that can film FULL HD STEREO images. The camera also has a 3D LCD screen that works without glasses, which does look pretty amazing. The drawback of the screen is that you cannot get too close or the 3D effect does not work, and if you are looking at slightly the wrong angle then you see a double image rather than a 3D on. Apart from recording full HD STEREO images this camera has other advantages over the Panasonic 750 – you can zoom the picture in 3D mode and you also have control over the convergence of the image when filming so you can change how close, or far away an object is. The major problem with this camera is how to edit the footage – currently the ONLY program that we have that understands this footage is Sony Vegas Pro 10/11. If we take the 3D file into any other editing program or even use CineForm, then you only see the results from one eye. This means that you can film in STEREO but it is very easy to produce a standard, mono, DVD/Blu-ray in any program which can accept AVCHD files, however, it does create more of a problem for editing. We expect this to change over time, since, at the time of writing this article at the end of October 2011, the camera is actually very new so many programs have not yet had the chance to support it.
Panasonic AG-3DA1 Full HD camera
This was the first reasonably priced camera (at approximately £16,000 street price not cheap camera but still cheaper than the professional cameras) that could record full HD images. Obviously it is a lot more expensive than the Sony TD10 mentioned above so what are the main differences?
- This camera films each eye as a separate file on to its own SD card. At the end of the edit you then take both sets of files, one for the left eye and one for the right eye, and combine them into a STEREO file. This may sound like a disadvantage because you have to do something to the images to make them usable, however it is actually an advantage because most STEREO editing programs or plug-ins expect you to have two separate files for left and right eye, so a lot more programs can work with the footage.
- The camera has better controls for fixing convergence (see below) built-in, as well as XLRs for audio and more filming modes.
DIFFERENT WAYS OF VIEWING 3D
Once you have the two pictures (left eye and right eye) you need some way to watch them. There are various methods:

ANAGLYPH – glasses with a RED filter over one eye and a Green over the other (other colour variations are possible). This has the advantage that you can watch it in ANY screen – you just need the right coloured glasses. The disadvantage is that the coloured glasses will have an effect on the colour of the video. |
SIDE-BY-SIDE – the left and right eye are squeezed into one picture 1920×1080 picture. This means the picture is actually 960×1080, so not full HD quality. However it is easy to do and ANY editing software can do this. Simply take both images and apply a motion effect to squeeze the left and right eye images into the correct part of the image. To watch the video in 3D plug into a 3D TV and choose SIDE-BY-SIDE – the TV does the rest. |

TOP AND BOTTOM – similar to side-by-side except the left and right eyes are squeezed into the top and bottom half of the picture. |

FRAME PACKING – sometimes called FRAME INTERLEAVING – two full quality images are packed into one file. This is the method used for professional 3D movies on Blu-ray and gives the best picture. However SIDE-BY-SIDE and the other formats can be put on a normal Blu-ray disc, where as FRAME PACKING needs to be done a different way to normal discs, and currently the only program we have that even attempts it is Sony Vegas (and even then there are no menus on this kind of disc) A frame packed image is generally saved in an MVC file, rather than the standard MTS files on a normal AVCHD camera. In the case of the Sony HDR-TD10 camera this is actually an MTS file which has the left and right video included as 2 separate streams along with the video. If that last sentence is getting a bit too technical, don’t worry, it just means that the two video pictures that make up the left eye and right eye are actually saved into one file, and that file is only readable by software that understands it. |
WHAT TYPE OF SCREEN DO YOU NEED?
 Anaglyph can be viewed on ANY screen – which is why it was the first way of making 3D movies and also the method adapted by YouTube. For the other formats you need a 3D screen and glasses which match. The glasses are either ACTIVE or PASSIVE. ACTIVE glasses are more expensive (although the TVs are cheaper) and the glasses have to be powered. The glasses sync with the screen so that the lenses open and close on each eye at at the right time to match the TV playback, making sure you get the correct image to the right eye and left eye.
Passive glasses are cheaper and do not require power (the glasses used at the cinema are passive glasses).
Some screens only work on computers and some are full-blown TVs. Our Sandybridge laptop can have a 3D screen instead of the standard 2D one for a small extra cost.
WHAT ABOUT EDITING THE FOOTAGE?
With these you take the clips produced (a file for the left eye and a file for the right eye) and combine them into a new file. The software then lets you choose how you display the 3D – anaglyph, SIDE-BY-SIDE etc.. just by changing a simple setting. You also get control over the CONVERGENCE and have access to all the other effects and filters in your program.
WHAT IS CONVERGENCE?
In addition to worrying about the focus. zoom etc you also need to worry about what part of your image represents the position of the TV on which the footage is watched. This is called the convergence. with proper 3D software you can control this and decide where the sections of your image appear to the viewer. You can also use it to do things like make titles and other added effects to move around in 3D space. Convergence is very important because it yuo get it wring your audio will end up feeling ill! Most cameras will let you adjust it as you film, although you really also want control of this in post production.