
Restore Offline clips
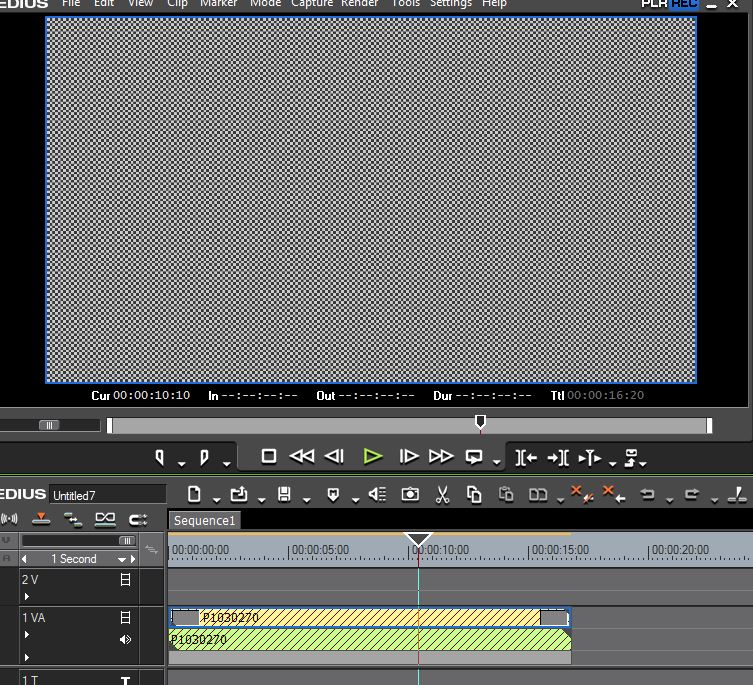
Sometimes when you have moved clips around on your computer or moved a project from one place to another EDIUS will be missing the original media that you have used in your edit. The media is probably still there but EDIUS cannot find it and so you have a big hole in your timeline as shown here. The offline clip on the timeline also has a series of diagonal lines.
Backup your project before restoring!
On this page I explain the ways of restoring missing clips in EDIUS. It is possible to relink to the wrong files as explained below. If you do this it will destroy your edit. Relinking files is not an action you can undo so once you realise your mistake you have messed up your project. As long as you don’t save the changes you can get back to the original version but a much better idea would be to make a backup of the project before relinking.
If just relinking one missing file it is not too bad to relink to the wrong clip. If relinking 100 clips and you make a mistake it is extremely annoying.
But why would you not back up your project files? They are very small, take up hardly ANY space and contain most of the hard work of your edit. EDIUS does make automatic backups, assuming you have set up the auto save options in your preferences, but make a back up of the project yourself from time to time, preferably on a different hard drive to the one where the main project resides. It is just good practice.
Knowing you have offline clips
On the bar at the bottom of EDIUS there will also be a broken symbol as shown and if you put the mouse over the symbol it will tell you how many clips are missing. This only tells you how many are missing for the currently open timelines, not in the entire project.
You need to restore these clips. To do this you can either double click on the icon or choose a heading from the file menu. Double clicking on the icon will only let you restore clips that are missing in the currently open timelines, it will not let you restore all the missing clips in the project.
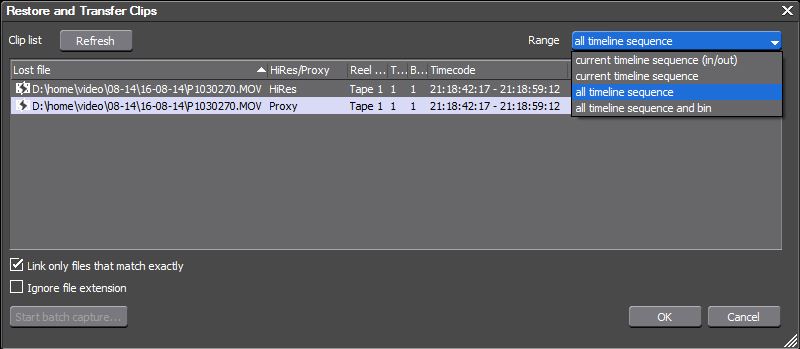
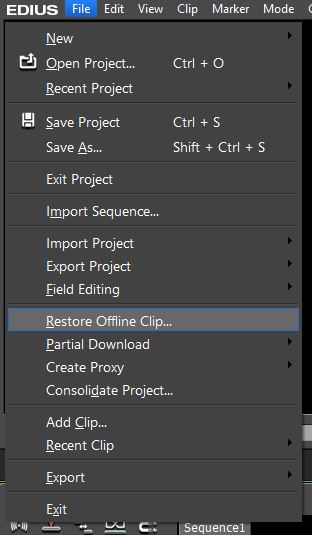 Opening the Restore offline clips box Opening the Restore offline clips box If you choose to restore offline clips from the heading in the file menu you can choose to restore just the clips which are used on the current timeline, all timelines or the entire project. If you choose the heading shown here you get practically the same dialogue box that you will get by double clicking on the icon on the bar, but there will be a couple of extra options as we will explain below.. |
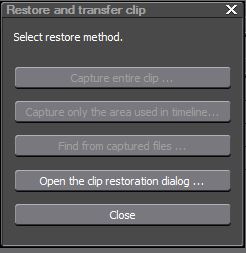 After selecting “restore offline clip” this dialogue appears. As you can see most of the options are greyed out. The first three options only become available if you have footage captured from tape. In my example I am using footage which was recorded on a Panasonic GH4 as MOV files so it cannot be captured from tape and the first three options are not relevant. After selecting “restore offline clip” this dialogue appears. As you can see most of the options are greyed out. The first three options only become available if you have footage captured from tape. In my example I am using footage which was recorded on a Panasonic GH4 as MOV files so it cannot be captured from tape and the first three options are not relevant. |
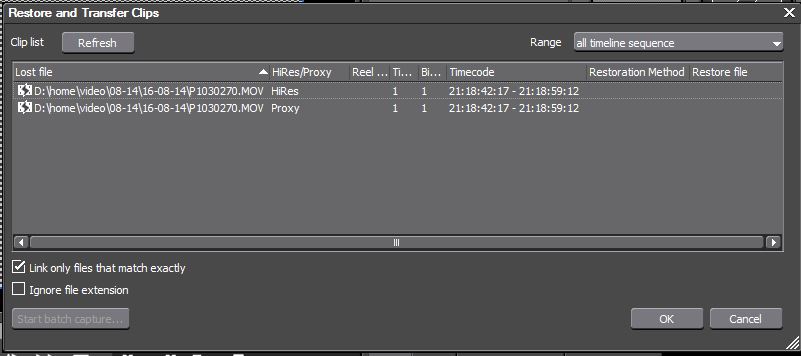 Restore off line clips dialogue Restore off line clips dialogue Choose open the clip restoration dialog and this box appears. The various columns show different useful information:
|
 |
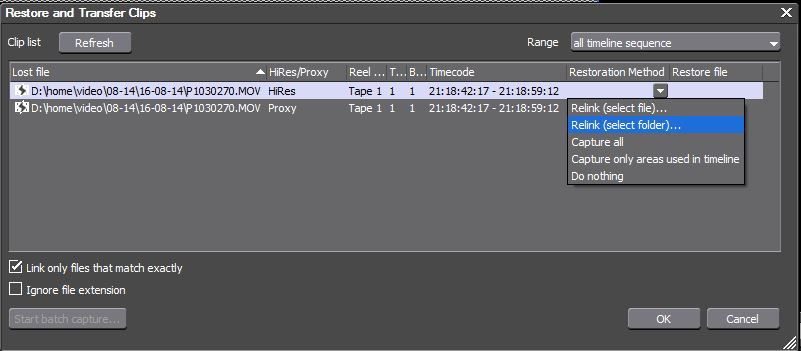 Choose the restoration method for either one file or a selection of files. “Select file” is only available if you have selected on file. “Select folder” is available for one file or a group of files. The capture options are available if you have recorded the footage from tape. If trying to select multiple files then first click on the heading “lost file”. This will sort the list of missing files into the order of the directories where they used to be. Then you can select all the files that used to be in the “video” directory on the D drive and point them to the video directory on the E drive (assuming that is where you have moved them!). Sometimes you can select files which are in different directories as well. Imagine you had a folder of media with subfolders for images, video, sound files etc. If you have just moved this entire media folder to another drive then sometimes you can select all the files that are in the subfolders of the media folder and choose “relink (select folder) and point them to the new media folder. EDIUS then relink all the files in both the media folder AND the subfolders. It does not work every time, because other things may have changed apart from the drive letter, but it does work on many occasions. Having selected a relnk method EDIUS relinks the files. Any that it did not relink will be listed. The relinking may take some time if there are many clips. Sometimes EDIUS even looks like it is not responding, or crashed, and it is just taking time to link the clips. If this happens when you are relinking many clips at once, wait. Hopefully it will respond after a while and everything will be relinked. If this happens when just relinking one link EDIUS probably has crashed (normally because there is something wrong with the file to which you are relinking) |
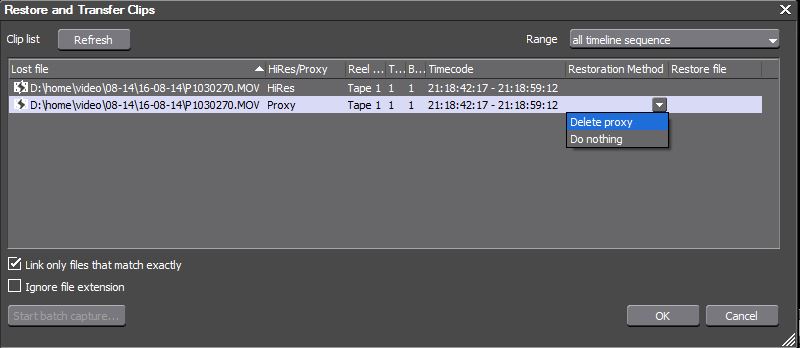 Proxy files cannot be relinked. Proxy files are low res versions of files that EDIUS has created to work with in EDIUS’ proxy mode. Normally you tell EDIUS to make these, although it can do it in the background in some circumstances. You may even have proxy files created when you did not realise this was happening. If you are trying to relink to a selection of clips and just one proxy file is included in your selection then the only options you will have on screen is “do nothing” and you cannot relink files. If you select all the clips that need relinking and do not include the proxy, then you can choose to relink to a folder of files. My proxy file is easy to see in the above list as I have only two files. If you have a huge list you may not notice you have a proxy file selected. The easiest way to find out if you have some proxy files in your list is to go to the column that says “HiRes/Proxy” and click on the heading. This should put all the off line clips in order and you can see how many proxy files you have. Select the proxy files and on the restoration method box choose “delete proxy”. That will get rid of all the proxies. Now you can select multiple clips and relink them to a folder of clips. |
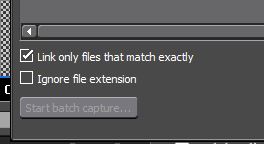 Linking to files that match exactly Linking to files that match exactly This tick box is in the bottom left of the dialogue box. It will only let you link to files that are exactly the same as the originals. If you files are different, but you know they are correct, then untick this box and you can link to files which are not the originals. A good example of this would be if you made an effect in another program, like Adobe After Effects, and imported the final made move from After Effects into EDIUS. Later you go and change the after effects composition and re-export the file. The new export is not the same as the old one but you can relink to it by unticking this box, and it will go into the right place in your edit. On some occasions when footage has been moved from one machine to another, I have had to untick this box to get EDIUS to link to files which really are the originals, just in the different place. Beware of unticking this box!By unticking this box you can relink to almost anything and if you relink to the wrong clip it will replace the original on your timeline with the incorrect video and you will not be able to undo the relinking and your edit will be destroyed! Always work on a copy of your project if trying to relink lots of clips, or make, if you relink to the wrong clips and mess up your edit, remember to close the project without saving it to get back to where you started! |
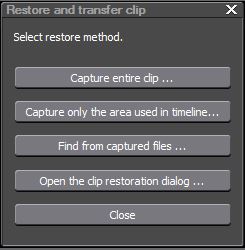 Re-capturing files off tape Re-capturing files off tape If you captured your files from tape originally you can recapture the missing footage off the tapes, provided they had timecode and tape names assigned to them. The tapes also have to have unbroken timecode and you need to be able to control the machine from which they are being captured. If the files came from tape then the first three boxes of the restore offline clips box will be active. They are fairly self explanatory. Capture entire clip or just the areas used in the timeline do what they say. If you choose either of these then you are presented with a list of clips that need capturing and you choose a capture preset and capture them. Find from captured files – this option will produce a list of clips that need capturing and you can point EDIUS to a folder where you have the captured clips and it will try and match the missing clips to the footage in the folder. the footage will need the tape name and timecode embedded in the files (which will be if they were captured properly with EDIUS). If you are using a clip which starts at 10 minutes and finished at 10 minutes and 30 seconds, and you have a file which has the same tape ID and , for example, starts at 5 minutes and finishes at 15 minutes, then EDIUS should be able to match this up and relink to the right bit of the clip. In practice it does not work on many occasions, especially if the files were captured in another program and EDIUS cannot read the tape name or timecode properly. Always work on a copy of the project when relinking like this. If EDIUS gets the relinking wrong it will destroy your edit. |
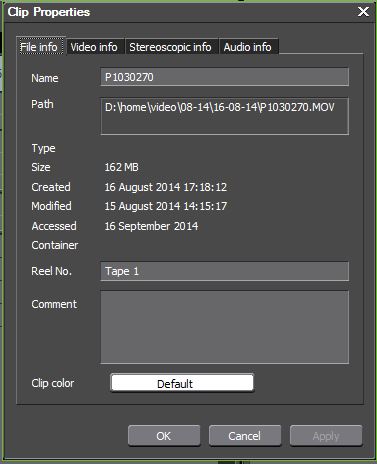 Adding a tape name to a file Adding a tape name to a file A common problem with relink to tape based files is that although the timecode is there, the tape name is not. You can add the tape name into offline clip on the timeline before opening the restore offline clips dialogue box. Open the properties for the clip and in the Reel No. box, type in the tape name. In this example I have added a Reel No. to a clip that was filmed on a Panasonic GH4 – a card based camera. However as the GH4 puts timecode on the clip it means when I go into the restore offline clips dialogue EDIUS thinks the clip came from a tape and I can recapture it. I cannot reacpture it off tape and entering a Reel No for this file is pointless, however, it is an option that I have used on occasion with missing footage that, for whatever reason, did not have a Reel No in the properties box. |
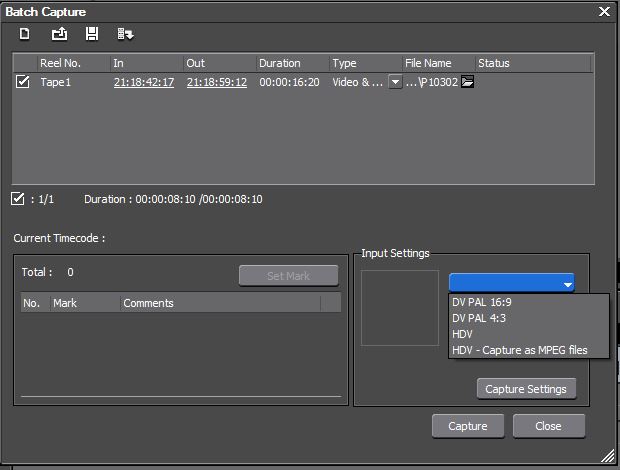 Batch capturing restored clips Batch capturing restored clips This box shows the batch capture box that appears if capturing tape-based clips. Error in device presetOften when you open this box you will have a message that says “error in device preset”. The device preset tells EDIUS how to capture footage from tape – the original footage may have come from DV, HDV or even analogue with a deck which is controlled by RS422. You need a different capture preset for each type of footage. When you open the batch capture dialogue box, if EDIUS cannot work out which preset to use it will come up with this error. You need to choose a device preset from the drop down list before you can continue. If you do not have a device preset for your deck you need to make one. |
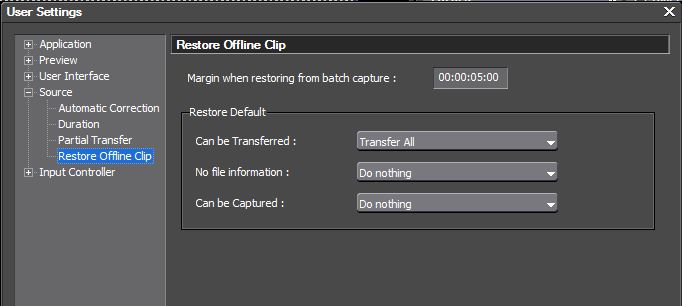 User preferences for Restore Offline clips User preferences for Restore Offline clips There are a selection of preferences for restoring offline clips in the user settings as shown. The options shown here have been changed from the defaults to my own preference. The two changes are in the “no file information” and “can be captured” boxes which I have changed to “do nothing”. If these are left in the default settings, if EDIUS has some files which it think can be restored by recaptuing them it will set the restore method automatically to “capture”. If you relink some files, but not the ones that need recapturing, when you leave the “restore offline clips” dialogue box, EDIUS will launch the batch capture window shown above, often with the “error in device preset” message. You then have to cancel the batch capture box and choose “cancel” to get out of the restore offline clips box. Doing that latter would imply that any clips you have managed to relink will be un-relinked (although, they do, in fact stay relinked).Personally I prefer, that, if I have clips that could be recaptured off tape, I can choose that as the restore method, rather than having the computer automatically select it, which is why I set this preference to “do nothing”. We have also had a reasonable number of tech calls asking why this capture box and device preset error message appear when people are trying to get out of the restore offline clips dialogue box. However, this is a preference which is why there is a setting in the user settings. |