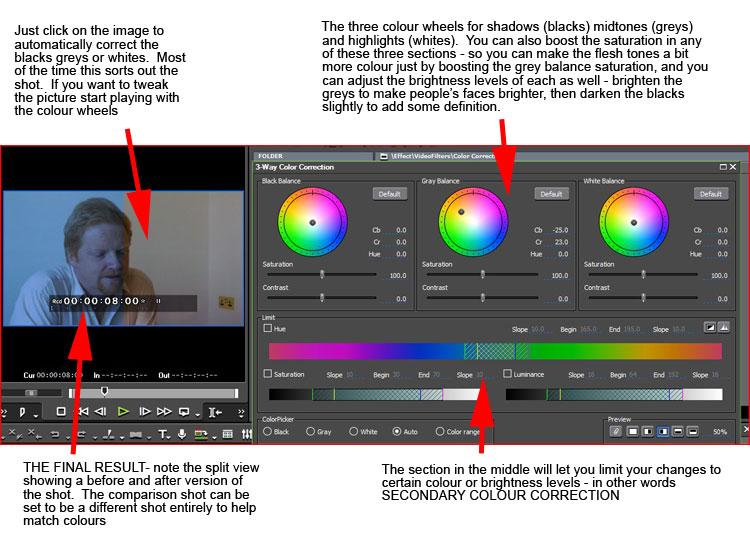
 Three Way Colour Corrector Three Way Colour Corrector
The Three Way Colour Correction (known as the White balance filter in EDIUS 5) is a great colour correction tool. Just click on the image and it will set the blacks, whites and midtones automatically. If this is not enough then start tweaking the image using the interface. Of course, everything plays back in realtime even with full HD or 4K footage. |
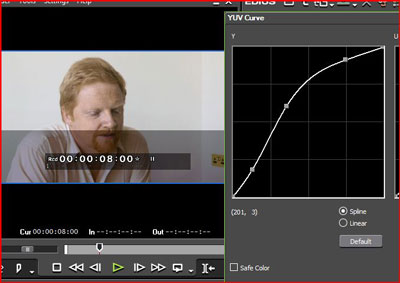 YUV curve YUV curve
The YUV curve lets you take an image and drastically change the look. The bottom half of this image shows how under-exposed the original shot was – the top have has been tweaked using the YUV curve. The line represents the brightness of the image with the point in the bottom left been black, and the point in the top right as white. By putting points along the line and dragging up we have increased the brightness of the midtones whilst not killing the bright areas, and by adding points near the bottom we can also crush the blacks to add a bit more definition.
This shot also started life too blue – but that was corrected by the 3 way colour corrector above and we are using these two filters together.
Notice the handy SAFE COLOUR tick box to make sure you do not change the image into areas you should not go!
This filter is called the YUV curve because it adjusts the Y levels (brightness) plus U (blue & yellow) and V (red and cyan). This picture does not show the U and V graphics and to be honest we use the 3 way colour corrector to sort out colour as we can generally get the results we want with a couple of clicks. |
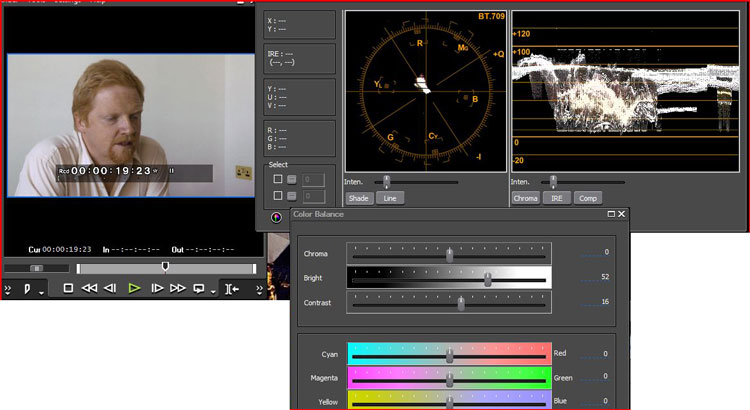 Waveform and Vectorscope Waveform and Vectorscope
EDIUS also has Vectorscope and waveform monitors built into the interface to help with colour and image correction. Here you can see the Vectorscope and waveform being used with one of EDIUS other colour correction filters – colour balance. Colour balance is a fairly simple way of changing colour (brightness and contrast sliders are just so last century ;-)), but still a way of improving shots easily.
These were significantly improved in EDIUS 9 and an RGB parade was added as well as support for HDR. |
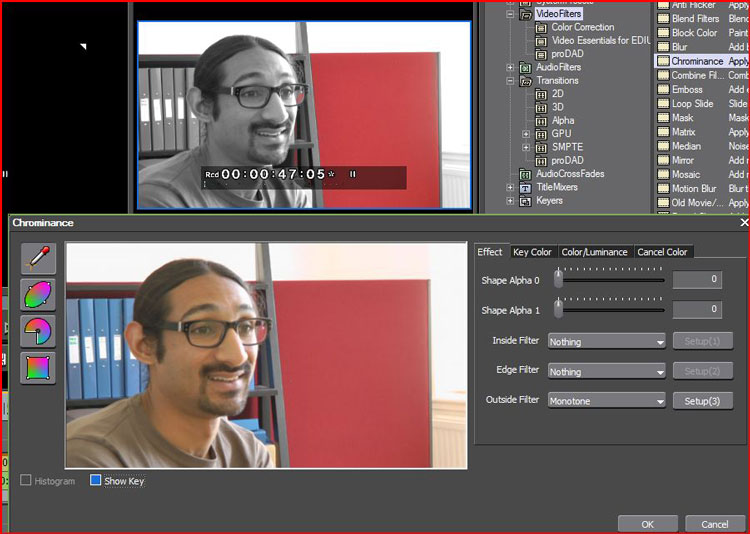 Chrominance Chrominance
The Chrominance filter works in a similar way to the Chromakey filter but instead of removing a certain range of colours and putting in another picture you can apply any of EDIUS’ filters to the parts of the picture you have selected. For example here we have selected the red screen and then made everything else in the image black and white.
This took about 10 seconds to set up. You can apply any of EDIUS filters to the keyed part of the image. The filter also allows you to apply a different effect to the edges between the two images. In this case we have achieved a “Schindler’s list” kind of effect but we could equally have taken the sky and changed the colour to something different, boosted the green of the grass or even put a wacky warp effect on a certain area.
You can also use it for advanced colour correction, selecting specific areas and adjusting just that region. |
Using a Mask filter for manipulating the image
Below you can see a simple oval mask over Ringo’s head, and we have told EDIUS to blur the area outside the mask, adding a soft edge so the join is not so noticeable. We could have used a variety of filters – for example add a sharpness filter to just the subjects face to overcome the fact the shot is slightly out of focus. Change the colour of just the area covered by the mask and even add a combination of filters to the masked area. The mask in this case is just an oval but you can draw a completely custom shape which you can animate over time to follow an object as it moves. The shape can be as simple or as complex as you want. In EDIUS 8 Grass Valley added the ability to get the computer to track the masked object across the screen. |
Anti-flicker
Very useful for stills this filter minimises the flicker caused by thin lines on an interlaced TV screen. Excellent for adding to still montages. |
Matrix
This filter makes all men in the shot look like Keanu Reeves.. OK it doesn’t really – it actually gives you control over sharpness and blur over the image but is actually quite hard to interpret. |
Sharpness
Sharpen up and image in real time. Again a time consuming filter if you need to do a lot of it – and here playing back in realtime. Great for trying to bring some focus back into a shot which is slightly out of focus. |
