Using the channel map feature in EDIUS 7 to output audio for archiving
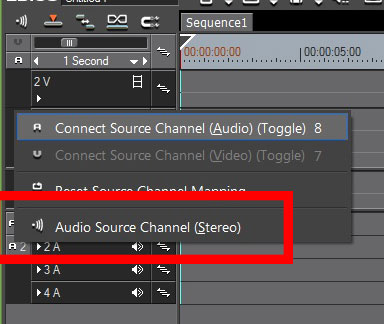
Channel mapping in EDIUS for archivingIf you want to make files where, for example, any sound that goes on track 1 will output to the first audio track of your file then you need to make sure you have the right project settings, set the “channel map” correctly and choose the right export settings. Firstly we would suggest you make sure that when audio is added to the timeline each channel is split into a separate track on the timeline. It is also probably easier to set up the channel mapping if you do not use VA tracks. You can use VA tracks but it is just slightly more confusing. To always insert the audio on to the timeline with each channel on a track right click on the start of the track header, where the V and A1 A2 etc. icons appear and click on audio source channel until it says mono in brackets. You can also add an icon to the mode bar for this switch as we have done in this example. |
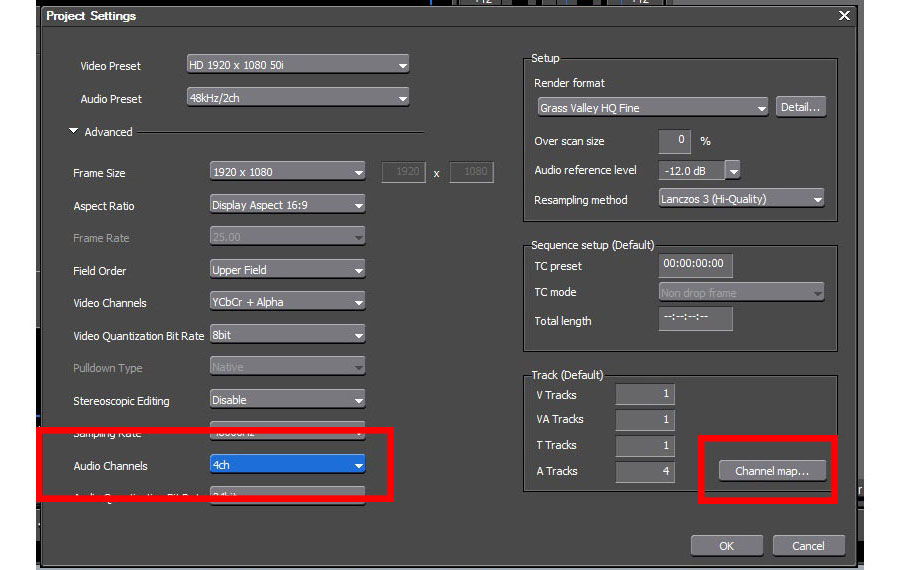
The next thing to do is decide how many audio tracks you want in your final 4. You can have up to 16. To set this access the project settings. Under “audio channels” you choose the number of channels you want in the final file. I have chosen 4 which I will use as follows: 1. Commentary/Voice over. If we just put all the commentary on one track then the person who receives the file can choose to just play that tracks, and completely loose all music and effects etc. This setting is not saying how many audio tracks you can have one the timeline – you can have as many of those as you like. This is saying how many tracks will be in the final file. Next we will tell EDIUS which tracks on the timeline go into which of these final 4 audio tracks. To choose where the tracks go click on the channel map button. |
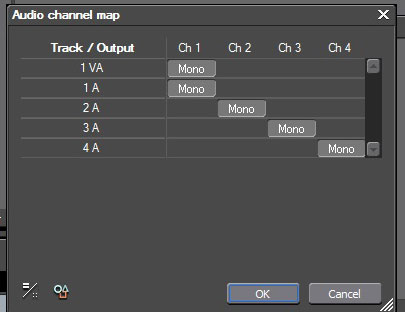
The Channel mapIn this dialogue you can see all the video tracks I have on my timeline in the column and my output tracks along the top. This shows the default number of audio tracks in a project. Just click on the word “mono” or “stereo” to flip between the two settings. Stereo means that any clips on that timeline track will go out to the two channels the word stereo spans and how loud it is on one track or the other is defined by the panning settings on the audio. Mono means whatever goes on that track will be output onto that audio channel in the final file and any PAN settings are ignored. So in this example everything on the VA and A1 track are going out to the 1st audio channel, everything on 2A is going out to the second, and so on. If I only had two audio tracks (which is the default for stereo output) then I would only have two channels along the top. If I was trying to get a surround sound file I would have 6 channels along the top. Changing the channel map in the project settings changes it for every new timeline in the project. If you want to change existing timelines or have different channel maps per timeline right you can change the channel map in sequence settings in the same way. |
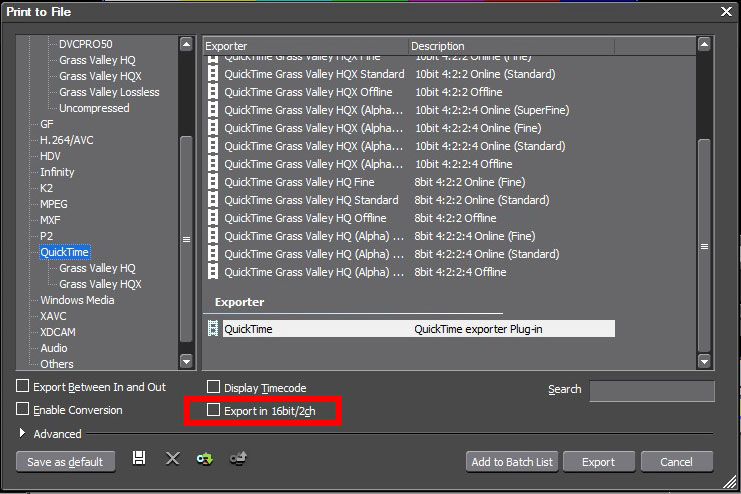
Print to fileWhen you have finished editing choose print to file. The following explains how to output a QuickTime file in Avid DNxHD format but is similar for most formats. Choose the format you want – I am choosing QuickTime, Make sure “export 16bit/2ch” is not ticked otherwise EDIUS will down mix the output to 2 channels regardless of the settings elsewhere. |

QuickTime SettingsThe following sections only really apply to exporting QuickTime files. With most other formats you simply click export and the file is made. After clicking export a dialogue box will appear asking where the file is to be made. Click on the settings box to access the QuickTime file settings. |
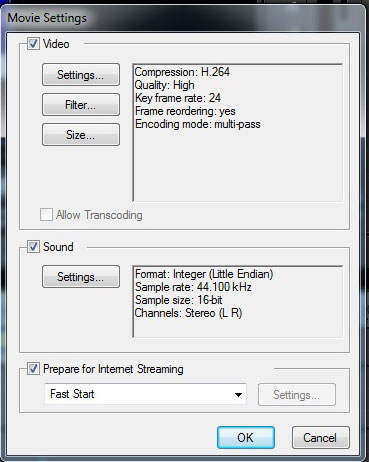
QuickTime Settings 2This dialogue box appears. To change the video codec to be Avid DNxHD you need to click on the settings box for video. To channel the audio channel settings we will need to click on the settings box for sound. I do not touch FILTER, SIZE OR PREPARE FOR INTERNET STREAMING. |
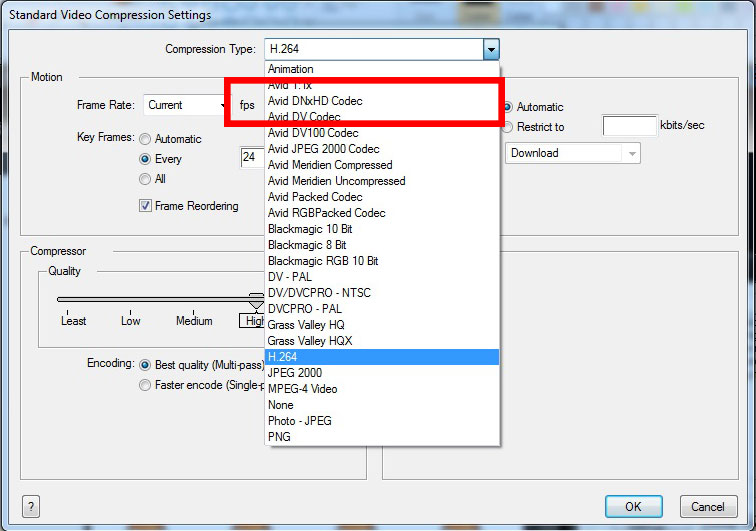
QuickTime video settingsIn the video compression settings box click on compression type and choose Avid DNxHD. This will only be available if you have downloaded and installed the Avid DNxHD codecs. These will be installed if you have Avid installed on the same system or you can download them for free from the Avid website: |
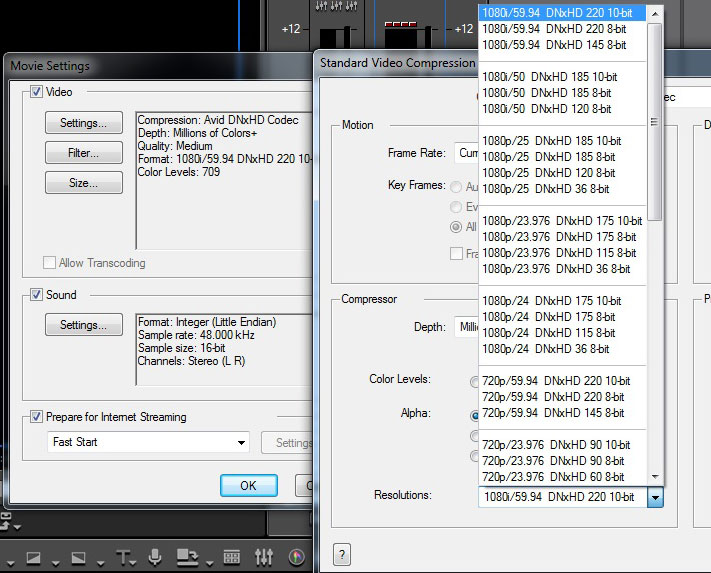
QuickTime video settings 2Once you have chosen Avid DNxHD choose the correct setting in the RESOLUTIONS box to match your timeline. Also just above this box you will see two tick boxes – one for 709 and one for RGB levels . I normally set this to “RGB” since setting 709 makes the video slightly washed out in some programs. However, it is not that straight forward as sometimes setting 709 is the best option for a particular editing program. If someone complains your footage is a bit washed out and the blacks are not really black then export again using the option you did not use before. In EDIUS you can change this on the file after it has been made using the “white” and “super white” options. |
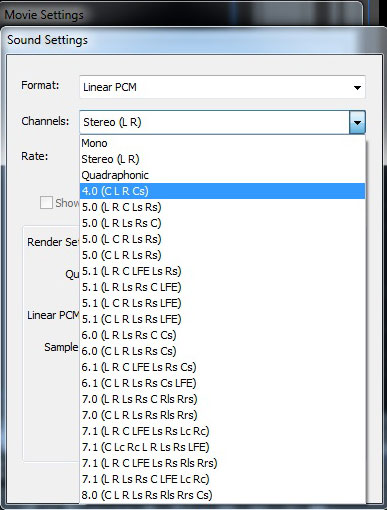
QuickTime audio settingsClick ok to accept these video settings and then click on the settings box for audio. Set linear PCM for the audio formats and then under channels choose 4 – since I chose 4 channels in the project setting I am choosing 4 output channels for my final file. If I chose 2 output channels then all the settings in the channel map would be a waste of time. I set the “rate”, in the box under channels which you cannot see in this image because it is obscured by the various options, to 48,000, rather than 44,100. Now click ok to get out of the audio settings and ok again to get back to the EDIUS file dialogue box. Give the file a name and export it. |
NotesHopefully this explains the procedure clearly. If you need further information emails as at sales@dvctraining.co.uk Some final things of which to be aware:
|
